How to Set Up Facebook CAPI on Any Website Without Writing a Single Line of Code
You've heard that Facebook Conversions API (CAPI) is the fix for broken tracking. Better data, better ad performance, fewer conversions disappearing into the void.
But then you look at the setup guides. Developer docs. Tag Manager configurations. Custom PHP hooks. JSON payloads.
You close the tab.
Here's the thing: it doesn't have to be that complicated. With PixelFlow's Visual Tagger, you can set up server-side event tracking on any website by clicking the elements you want to track. No code. No developer. No Google Tag Manager.
This guide shows you exactly how it works.
What Is the Visual Tagger?
The Visual Tagger is a point-and-click event setup tool built into PixelFlow. Instead of writing code or adding CSS selectors to a config file, you click directly on buttons, links, and form elements on your live website to tell PixelFlow what to track.
Think of it like this: imagine being able to walk up to your website, tap a button, and say "track this as a Lead event and send it to Meta" That's exactly what the Visual Tagger does.
It works on every major website platform: Webflow, Framer, Squarespace, WordPress, and even fully custom-built sites. If it loads in a browser, you can track it.
Why This Matters for Your Facebook Ads
Most businesses running Facebook ads are missing 30-50% of their conversions. Not because their website is broken, but because Facebook's standard Pixel runs in the browser and gets blocked.
iOS privacy settings block it. Ad blockers block it. Safari's Intelligent Tracking Prevention limits it.
The fix is server-side tracking: sending conversion data directly from your server to Facebook, bypassing browser restrictions entirely. That's what the Conversions API (CAPI) does.
The problem has always been setup. Server-side tracking traditionally required a developer to write custom code for every event you wanted to track. A button click here, a form submission there, each one needing its own implementation.
PixelFlow solves the developer dependency. The Visual Tagger handles the event mapping. The server-side layer handles the rest.
How to Track Any Button or Form in 3 Steps
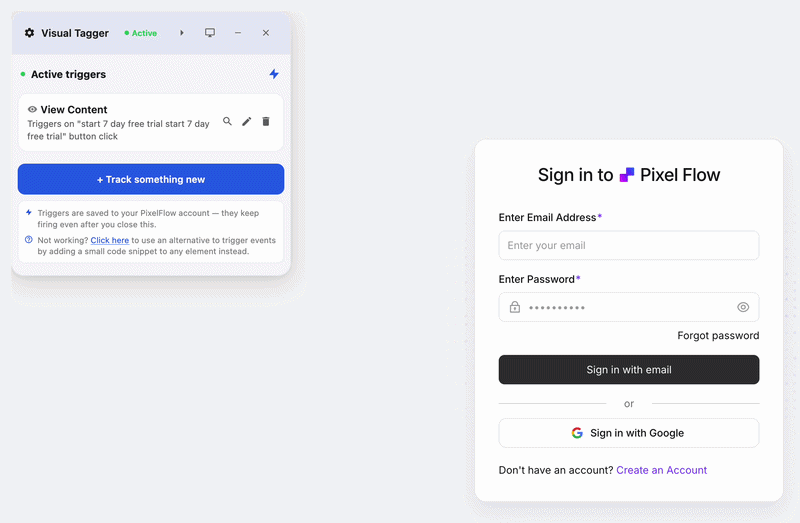
Step 1: Open the Visual Tagger
Inside PixelFlow, navigate to your site's tracking settings and open the Visual Tagger. You'll see your live website load inside an interactive frame.
No need to switch tabs or open a separate tool. Everything happens in one place.
Step 2: Click the Element You Want to Track
Click directly on any button, link, or form on your website. The Visual Tagger highlights the element and prompts you to assign it a Facebook event type.
You can track:
Lead: form submissions, quote requests, contact forms
InitiateCheckout: add to cart clicks, checkout button presses
Purchase: order confirmation actions
ViewContent: key page visits or product views
Anything else!
No CSS selectors. No JavaScript. Just click and assign.
Note: We also have direct integrations with platforms like Stripe and Calendly if you need to send events directly from those instead.
Step 3: Confirm in the Event Monitor
Once you've tagged an element, you can fire a test event directly from the Visual Tagger. The Event Monitor shows you the result in real time: did the event fire? Was it sent to Facebook CAPI successfully? What data was included?
If something looks off, you'll see it immediately: before it affects your actual ad campaigns.
What Is the Event Monitor?
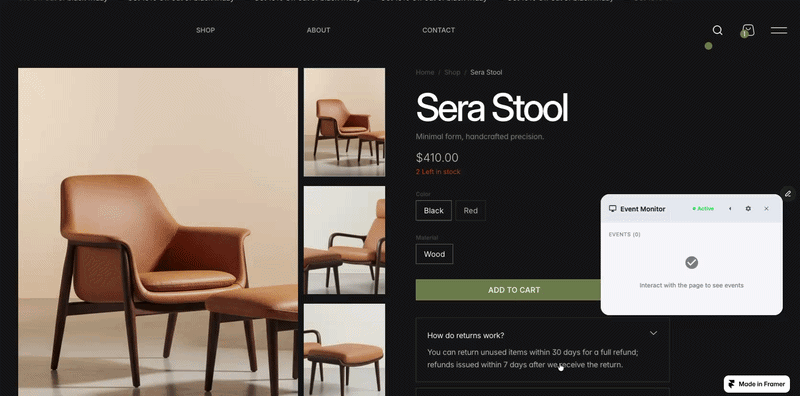
The Event Monitor is PixelFlow's live event log widget that sits on your website and lets you see events triggered by you in realtime for testing. Every time an event fires on your website, you see it appear in the monitor with full detail: the event type, the timestamp, the match quality data that was sent, and whether it reached Facebook successfully.
You can also see your full logs in your PixelFlow event logs too which show you even more data.
The Event Monitor is the difference between hoping your tracking works and knowing it works. Its useful for testing your setup in realtime after you've added any event triggers on your website. Its purpose is:
Check event status - confirm events are being sent properly
See Data captured: See what customer data was included with the event (email, phone, IP, browser info). More data means better Event Match Quality scores, which means better ad optimization.
Ensure tracking / triggers are setup properly - you can trigger an event (eg. form submission) and see it triggered in realtime.
Its a quick reference to ensure your events are being triggered properly on your website.
Event deduplication: PixelFlow automatically deduplicates events so you're not double-counting the same conversion between the browser Pixel and the server-side CAPI call. The Event Monitor confirms this is working correctly.
Bot filtering: Automated crawlers and bots can inflate your event counts and waste ad spend. PixelFlow filters known bots before events reach CAPI.
Works on Every Platform
Most server-side tracking tools are built for one platform. WooCommerce plugins for WordPress. Native integrations for Shopify. Nothing for the rest.
PixelFlow's Visual Tagger works everywhere because it operates at the element level, not the platform level. If it's a clickable element on a webpage, you can track it (note: iFrame embeds are not trackable)
Webflow: Tag form submissions, CTA buttons, pricing page clicks, anything you want to measure.
Framer: Track contact form completions and button clicks on portfolio and landing pages.
Squarespace: Set up purchase, checkout, and lead events without touching Squarespace's limited native integrations.
WordPress: Works alongside PixelFlow's dedicated WooCommerce plugin for combined e-commerce and page-level tracking.
Custom sites: One script tag and the Visual Tagger handles the rest.
How Does This Compare to Google Tag Manager?
Google Tag Manager (GTM) is powerful, but it was built for data engineers, not marketers. Setting up a custom event in GTM involves triggers, variables, tag configurations, and a lot of trial and error. Even experienced marketers spend hours on a single event setup.
PixelFlow's Visual Tagger does the same job in minutes. You're not giving up capability: you're removing the complexity that was never necessary in the first place.
For the vast majority of businesses running Facebook ads, the events that matter are: Lead, Purchase, InitiateCheckout, AddToCart, and ViewContent. The Visual Tagger handles all of these with a few clicks.
If you need programmatic event tracking or API-level control, PixelFlow supports that too via its programmatic tracking API for developers. But most users never need it.
Common Questions
Do I need to add any code to my website?
Yes, but only once: a single script tag that you paste into your website's header. After that, all event setup happens inside PixelFlow using the Visual Tagger. Most website platforms have a global code injection setting where you can add this in under two minutes.
Will this work if my website is already using the Meta Pixel?
Yes. PixelFlow works alongside the standard Meta Pixel. Events are automatically deduplicated so Facebook doesn't count the same conversion twice. In fact, running both is the recommended approach: the Pixel captures what it can, CAPI captures everything else, and deduplication ensures clean data. And PixelFlow loads both your Pixel & CAPI for you.
How do I know my events are actually reaching Facebook?
That's what the Event Monitor is for. Every event shows a confirmation status. You can also check your Facebook Events Manager directly: events sent via CAPI appear there the same way browser events do, just with higher match quality.
What about privacy and GDPR?
PixelFlow processes events server-side, which means it handles customer data the same way any server does. Raw IP addresses are hashed and discarded after processing. You can review PixelFlow's full privacy approach in the documentation.
Who Should Use the Visual Tagger?
The Visual Tagger is for anyone who needs custom event tracking without the cost or complexity of developer involvement.
If you're a business owner running Facebook ads and you've been putting off CAPI setup because it seemed too technical: this removes that barrier.
If you're an agency managing multiple client sites: the Visual Tagger lets you set up and verify event tracking for each client in minutes, not hours. And the Event Monitor gives you proof to share with clients.
If you've tried Google Tag Manager and found it more complicated than it should be: the Visual Tagger is the answer.
Get Started
PixelFlow offers a 7-day free trial with no credit card required. Add the script, open the Visual Tagger, and you can have your first events firing to Facebook CAPI today.